No Products in the Cart
Recently, I decided to try my hand at making an asset pack for a retro style horror game. I wanted to do this for a couple of reasons. For one thing, I needed to work on my pixel art. I felt confident in making sprites but not necessarily backgrounds. I also wanted to learn to make a tileset so that I could apply it to my own games eventually. As I was doing some research, I was able to find art tutorials, but couldn’t find any technical tutorials on how to execute the files for the tileset. What dimensions should my file be? What file type do I use? How many files do I include? I had so many questions. So I thought I would do a bit of a review of what I learned making my first asset pack.
My first though was “I know I can make this art, but how do I start?” After several Google searches, I found that there’s isn’t exactly a specific files size you need to start with. The tiles will be drawn into the game, so as long as your art fits within the game’s parameters, you’re golden! I chose to make my pack for GB Studio, which has some limitations regarding tile sizes and a limited number of tiles that I needed to follow. I would suggest having a specific program in mind, and double checking that program’s documentation to make sure your tiles meet their parameters. You can then start a file to make the tiles and increase the canvas as needed.
2. What file types do I need?
Again, this is going to be dependent on the program that the person who uses the pack will be using to create the tilesheets. When I created my tiles, I included the original Aseprite files I used to make the tileset, .PNGs of the tiles, and a TypeScript JSX file. When I created the pack at first, I assumed that the art files would be enough, but that was a mistake! The TypeScript file helps the game program to take the art and make it into tiles, so make sure this is included. I made my TypeScript file with a program called Tiled which allowed me to import my .PNG file.

One major issue I encountered was with tiles overlapping each other. When creating my files, I have items that were getting into other items “personal space” which caused the creation of some weird, unusable tiles. When making your tilesheet, make sure to consider what space each tile is sharing.
3. Don’t Assume The User Can Read your Mind
I found this to be a HUGE me problem for this tile set. When I originally created the art files, I created what I thought was identifiable set pieces. Just because I see an item as clear and straightforward, doesn’t mean it is. Make sure that you are being clear about what your props are in the tileset. If you aren’t sure you’re capturing the idea of the object you’re drawing, get a few opinions.
4. Test Test Test Test
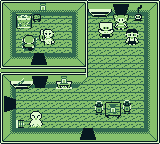
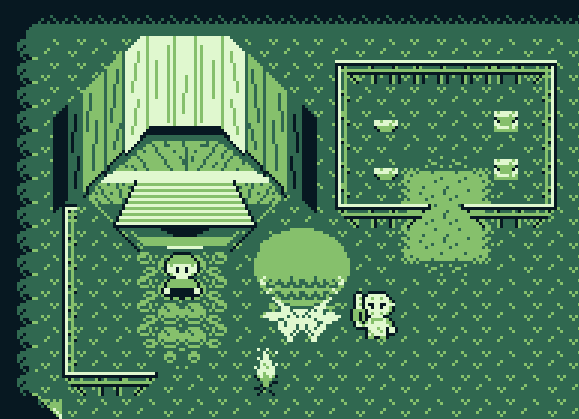
Sometimes a tile seems like a great idea in isolation, but then when you use is as part of a larger picture, it doesn’t turn out like you want. Take the example of the image above. This includes an early draft of the tiles I used, and shows some issues that needed more testing. For one thing, the top of the cabin’s roof looks great, but many of the rest of the roof is lost when placed upon the grass. The grass itself is very hard to look at when used in large areas. The tree looks like a grumpy face. I could go on. The point is, make sure you create mock ups and test your tiles together and with sprites to make sure everything comes across like you want it to.
5. Be Kind to Yourself and Others
This was my first asset pack, so I didn’t expect for anything to go perfectly. There were lots of errors after I published it. Whenever someone brings an error to your attention, that’s a chance for you to grow and get better. Assume that they are being positive as they let you know their concerns. Don’t take it personally if something doesn’t turn out like you want it to. Everyone makes mistakes. We are all human. Keep growing and learning.
That’s my summary of what I learned so far with releasing my first asset pack. If there are any other tips or advice, feel free to drop a comment below!